 Skip to content
May 31, 2018
posted in: Tutorials
This DIY tutorial article covers complete steps for the construction of an 11-foot Cowboy Trail Boss multipurpose tarp, designed by kitsapcowboy AKA Christian Bynum of Bynum Graphic Design.
It is constructed using Dutch’s Xenon Sil Wide fabric.
The Trail Boss is an efficient, all-season widebody hammock tarp that is optimized for additional pitches on the ground to provide wraparound weather protection in a variety of “bushcraft-style” configurations using some hiking poles (or trail sticks) and the same tarp ridge line, guy lines, and stakes used over a hammock.
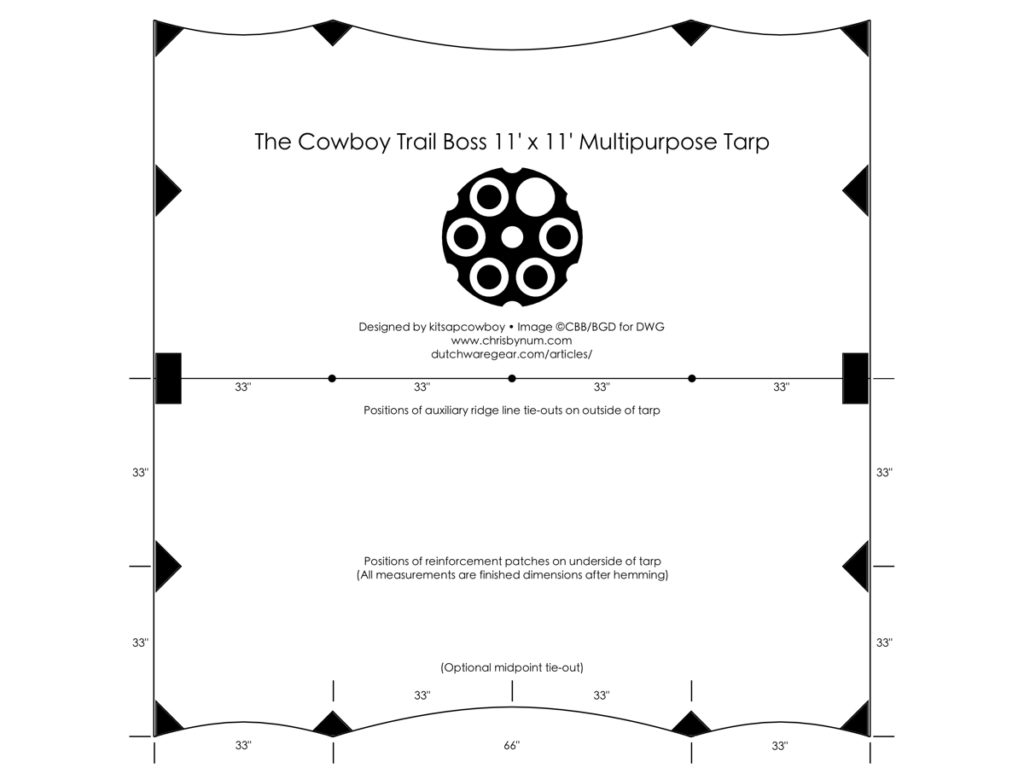
The finished size is about 132″ square. The Trail Boss can also be used over two hammocks hanging side by side!
Project Overview
| Skill Level | Estimated Time | Estimated Cost |
| Intermediate | Approx 10 hours | $$ |
Materials and Tools
| Materials Needed: | Tools Needed: |
| 8 Yards Xenon Sil Wide waterproof polyester fabric | Sewing Machine |
| 1/2 Yard 300D Pack Cloth or other reinforcing fabric | Scissors |
| 5 Yards 1.5″ Grosgrain | Rotary Cutter (optional) |
| 10 Feet 1/2″ Grosgrain | Ruler/Tape Measure |
| 2 3/4″ Beastee Dee Rings | Marker or Chalk |
| 14 1/2″ Beastee Dee Rings | Lighter |
| 8 LineLoc 3 Adjusters | Masking Tape (optiona) |
| Guttermann Mara 70 Thread | Clips or Pins (optional) |
Construction Steps
PHASE I — TARP PANELS
1) To build an 11′ x 11′ Cowboy Trail Boss Tarp, cut and trim the Xenon Wide waterproof fabric into two panels 134″ x 69″, and then orient them in a stack with right sides touching. (They should be free of selvage on both long edges with corners square and opposite sides parallel to form identical rectangles as precisely as possible.)
2) Sew together one long edge of the stacked tarp panels with a seam allowance of no more than 1/4″.
3) Invert the two tarp panels so that they are right side out, putting tension on the seam sewn in Step 2, and fold them so that the edges are aligned and the seam lays flat and crisply creased with the raw edges tucked between the panels.
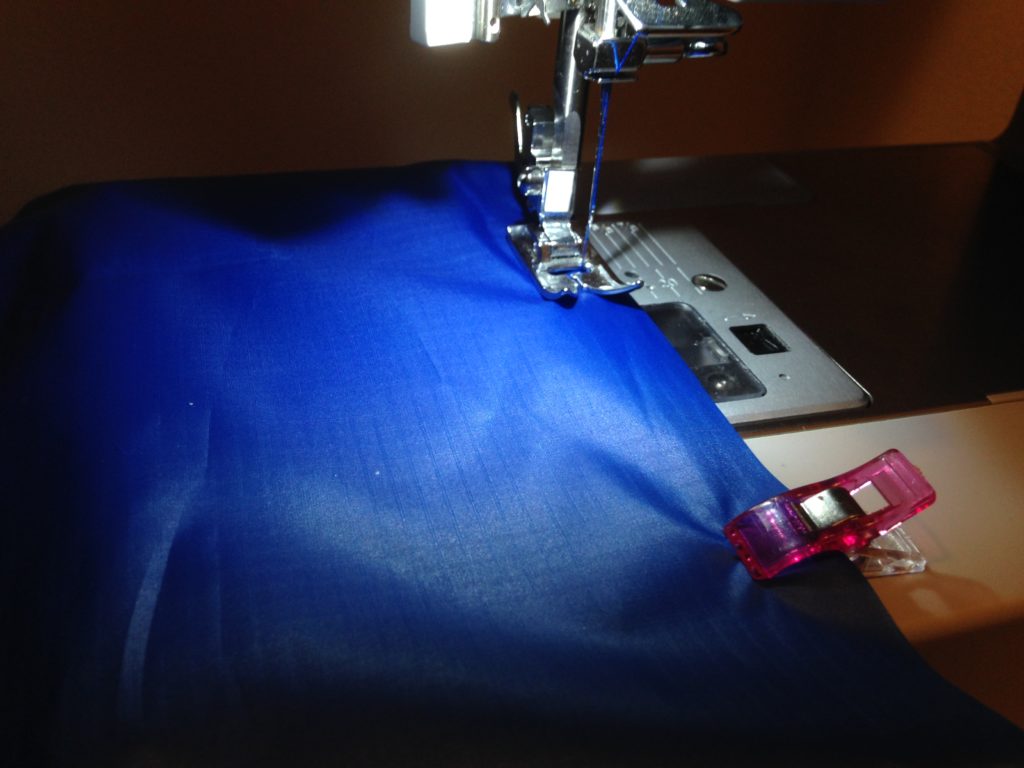
4) Sew a second row of stitches parallel to the seam sewn in Step 2, approximately 3/8″ to 1/2″ from the previous row, forming a standing (French) seam, the tarp’s ridge line.
5) Lay the joined tarp panels flat, make sure the edges are aligned, and, moving the two layers of fabric together, fold one end of the tarp panels back on top of the other end, so that the two ends of the sewn French seam are stacked; all four corners should also be stacked with the fold running perpendicular to the ridge line seam.
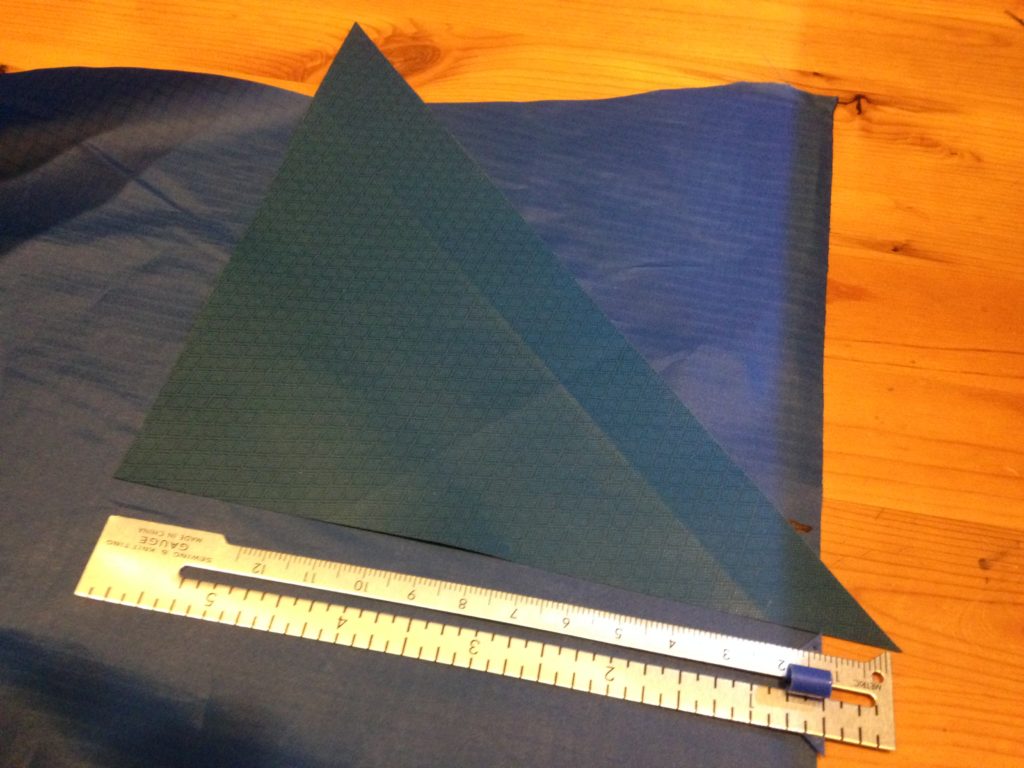
6) Starting at the four stacked corners where the remaining raw edges meet, allowing a 1″ allowance along the short edges of the tarp panels, align the 33″ cat-cut template with the raw edge of the tarp panel running parallel to the ridge line (see overview diagram for Phase I); mark and cut out this shape through all four layers of fabric with a rotary cutter. (Be careful not to let the fabric shift or the template slide as you cut out this shape.)
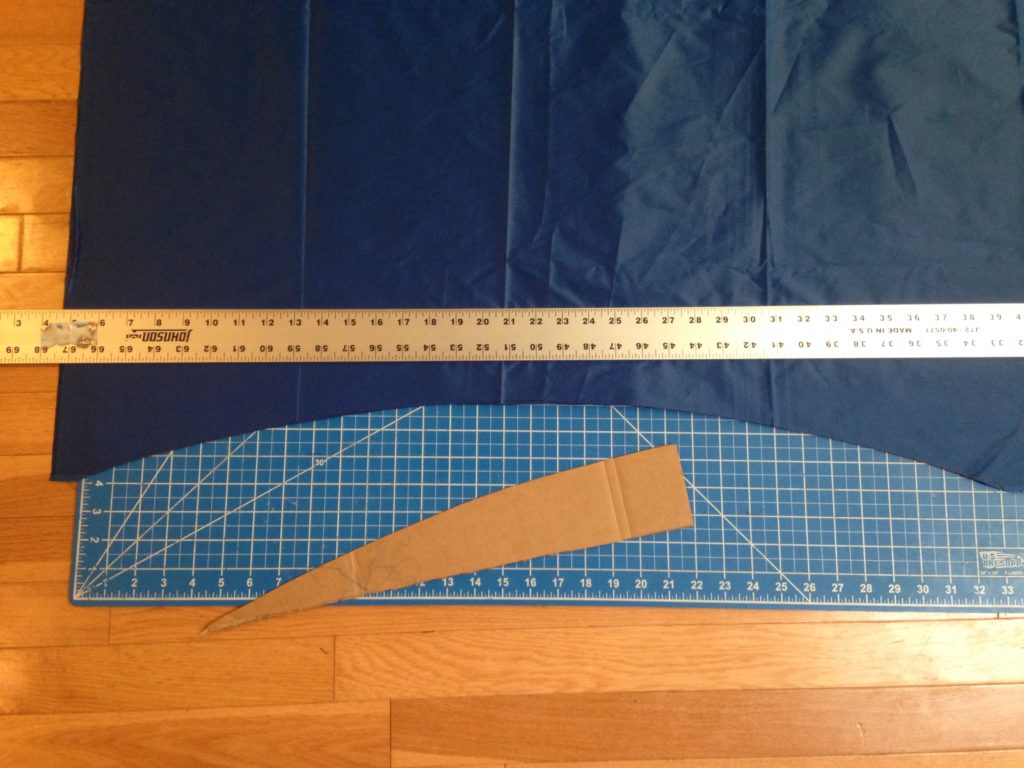
7) Starting at the inboard end of the 33″ cat-cut formed in Step 6, align the half template for the 66″ cat-cut with the raw edge of the tarp panel running parallel to the ridge line, making sure it is square with the fold at the midpoint of the tarp panels; mark and cut out this shape through all four layers of fabric with a rotary cutter. (Be careful not to let the fabric shift or the template slide as you cut out this shape. Reserve the scraps to make a stuff sack for the tarp.)
8) Mark a point 33.5″ down from the ridge line seam on each tarp panel on each short edge (4 marks total). Mark the midpoint of each tarp panel on the two cat-cut long edges, which should coincide with the exact centers of each of the 66″ cat-cuts. From each of the four outside corners of the tarp, mark a point 5.5″ up toward the ridge line on the short raw edges at the ends of the tarp panels and a mark 5″ into the 33″ cat-cut on the curved edge that will run along the ground parallel to the tarp ridge line. Then set the tarp panels aside.
PHASE II — REINFORCEMENT PATCHES & PERIMETER HEM
9) Cut out four (4) 9″ x 9″ squares of 300D pack cloth. Cut one square in half from midpoint to midpoint on opposite sides to form two (2) 4.5″ x 9″ ridge line reinforcement patches. Cut each of the three remaining 9″ x 9″ squares from corner to corner on each diagonal; each square will yield four (4) triangular edge reinforcement patches with a 9″ base and a 4.5″ height, for a total of twelve (12) triangular patches.
10) Form a folded hem 1/4″ wide on three sides of each rectangular patch cut in Step 9, sewn close to the raw edge with a single row of stitches, leaving one long edge raw on each. Set the hemmed rectangular patches aside.
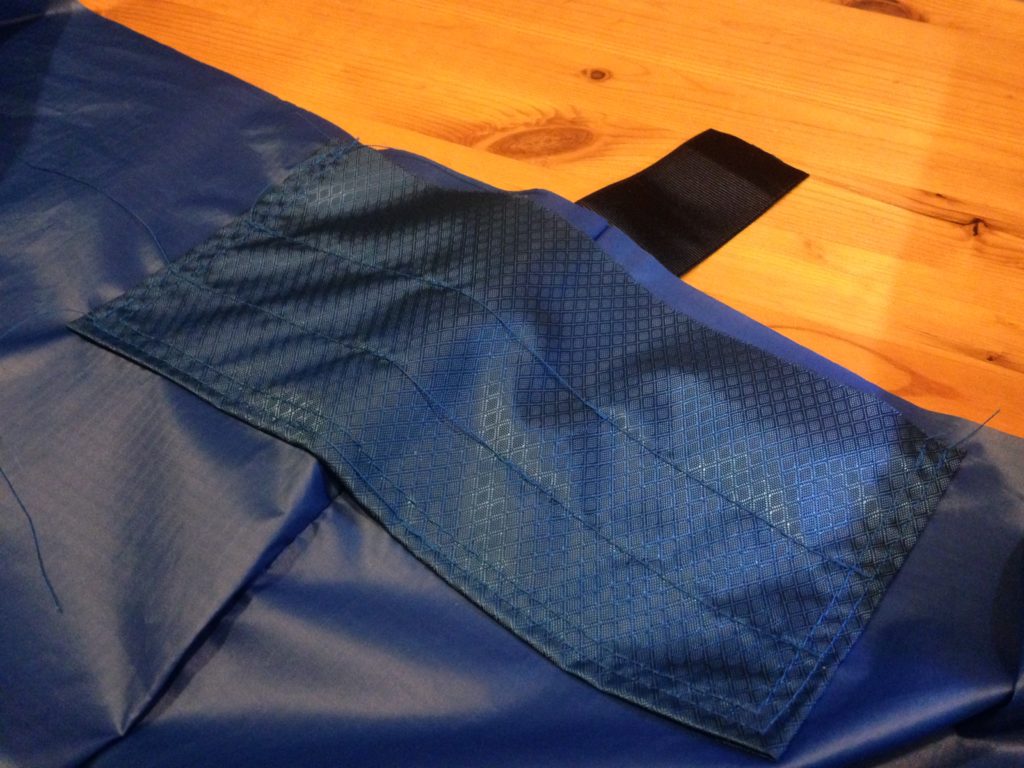
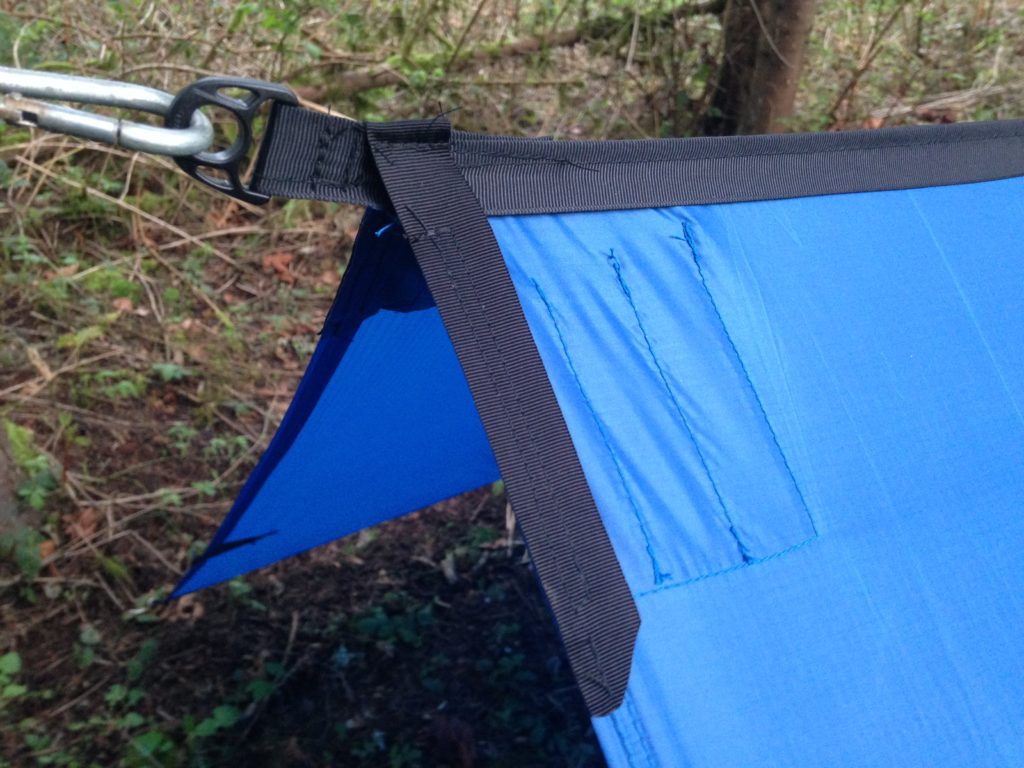
11) Pick out four (4) triangular patches cut in step 9 for the corners of the tarp, reserve two (2) additional triangular patches, and set them aside. On the remaining eight (8) triangular patches, form a folded hem 1/4″ wide on the two equal sides of each rectangular patch cut in Step 9, sewn close to the raw edge with a single row of stitches, leaving the long edge raw on each. Set the hemmed triangular patches aside.

12) Lay the tarp panels out with the wrong side up (i.e., so that the underside of the tarp is in view), and pick one of the four outside corners. Lay one of the unhemmed triangular patches wrong side up on top of the tarp corner, so that the longer 9″ base edge runs across the corner from edge to edge and aligns with the marks made near each corner in Step 8 with the apex of the triangle pointing inboard toward the center of the tarp panel.
13) Sew a single row of stitches (running in a diagonal relative to the tarp ridge line) 1/2″ inboard across the longer base edge of the triangular patch you positioned on the tarp corner in Step 12, affixing it to the tarp panel (see overview diagram for Phase II). Flip the triangular patch over along the seam just sewn so that it points out in the direction of the corner, away from the center of the tarp panel, with the right side facing out. Tension both the patch and the tarp corner, and sew a second row of stitches parallel to the first row 1″ away across the triangular patch to secure it flat to the corner of the tarp, hiding the folded raw edge. Trim the patch even with the tarp corner along both the straight and cat-cut edges.
14) Repeat Steps 12 and 13 for the remaining three (3) tarp corners using unhemmed triangular patches.
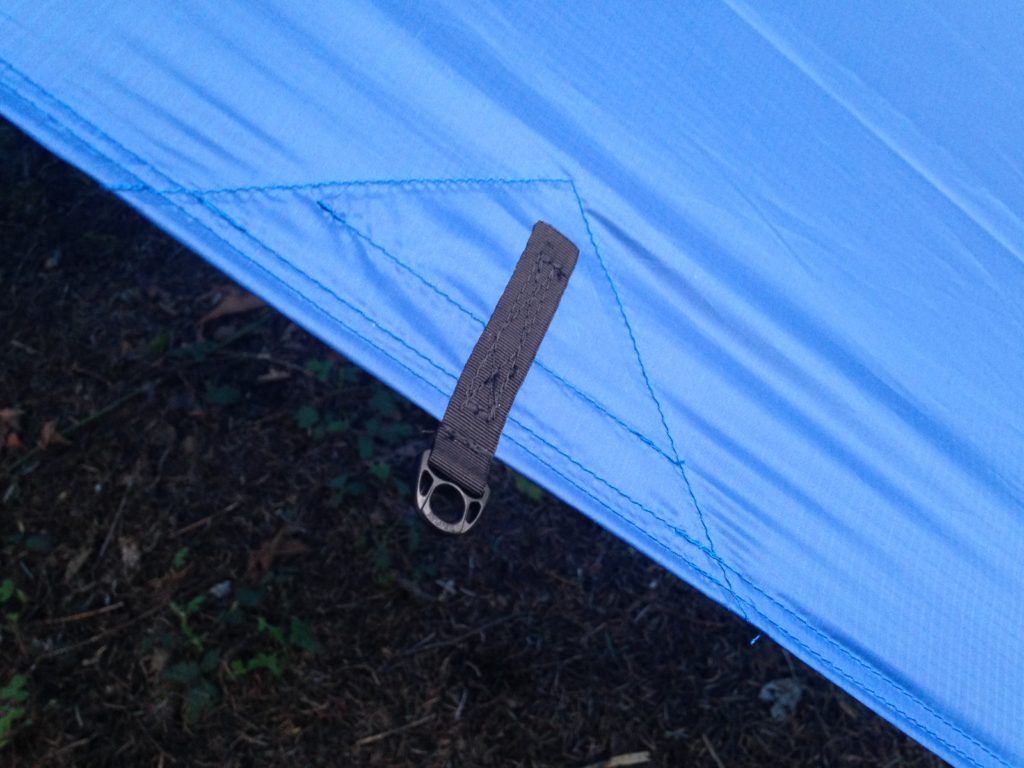
15) With the tarp panels still wrong side up (i.e., the underside of the tarp in view), pick one of the four points where the 33″ cat-cuts and 66″ cat-cuts come together, a location for one of the primary side tie-outs. Position one of the hemmed triangular patches so that the midpoint of its longer 9″ base edge is over this point where the cat-cuts meet and the unhemmed edge is parallel to both the long edge of the tarp and the tarp ridge line.
16) Sew around the perimeter of the hemmed triangular patch you positioned at the side tie-out location with a row of stitches between the stitches securing the patch’s folded hem and the hemmed edge, affixing it to the tarp panel (see overview diagram for Phase II). Then sew a row of stitches across the triangular patch from hemmed edge to hemmed edge parallel to the base edge of the patch, an equal distance from both the base and the apex, securing it to the tarp further. Trim the triangular patch along the base edge even with the curved edges of the cat-cuts.
17) Repeat Steps 15 and 16 for the remaining three (3) side tie-out locations using hemmed triangular patches.
18) With the tarp panels still wrong side up (i.e., the underside of the tarp in view), pick one of the four points where the 33.5″ down from the tarp ridge line on the short edges at the ends of the tarp panels, as marked in Step 8, a location for one of the tarp’s secondary tie-outs. Position one of the hemmed triangular patches so that the midpoint of its longer 9″ base edge is over this mark and the unhemmed edge is parallel to the short edge of the tarp panel and perpendicular to the tarp ridge line.
19) Sew around the perimeter of the hemmed triangular patch you positioned at the secondary tie-out location with a row of stitches between the stitches securing the patch’s folded hem and the hemmed edge, affixing it to the tarp panel (see overview diagram for Phase II). Then sew a row of stitches across the triangular patch from hemmed edge to hemmed edge parallel to the base edge of the patch, an equal distance from both the base and the apex, securing it to the tarp further.
20) Repeat Steps 18 and 19 for the remaining three (3) secondary tie-out locations using hemmed triangular patches.
NB: Steps 21 through 23 are OPTIONAL, but they afford you extra ground pitch options with the Trail Boss and allow you additional stability and center internal pole compatibility over a hammock.
21) With the tarp panels still wrong side up (i.e., the underside of the tarp in view), pick one of the 66″ cat-cuts and find the midpoint, as marked in Step 8, a location for one of the tarp’s two ancillary storm tie-outs. Position one of the hemmed triangular patches so that the midpoint of its longer 9″ base edge is over this mark and the unhemmed edge is parallel to the short edge of the tarp panel and perpendicular to the tarp ridge line.
22) Sew around the perimeter of the hemmed triangular patch you positioned at the storm tie-out location with a row of stitches between the stitches securing the patch’s folded hem and the hemmed edge, affixing it to the tarp panel (see overview diagram for Phase II). Then sew a row of stitches across the triangular patch from hemmed edge to hemmed edge parallel to the base edge of the patch, an equal distance from both the base and the apex, securing it to the tarp further. Trim the patch to match the tarp edge, if necessary.
23) Repeat Steps 21 and 22 for the other storm tie-out location using the remaining hemmed triangular patch.
With the tarp panels still wrong side up (i.e., the underside of the tarp in view), pick one end of the ridge line seam, a location for one of the tarp’s ridge line tie-outs. Position one of the hemmed rectangular patches so that the midpoint of its longer 9″ base edge is on the ridge line seam that joins the two tarp panels and the unhemmed edge is parallel to the short edge of the tarp panel and perpendicular to the tarp ridge line.
25) Taking great care not to sew across the ridge line or catch the standing portion of the French seam that forms it, sew around the perimeter of the hemmed rectangular patch you positioned on the ridge line seam with a row of stitches between the stitches securing the patch’s folded hem and the hemmed edge, affixing it to the tarp panel. Then sew two additional rows of stitches across the rectangular patch from short hemmed edge to short hemmed edge parallel to the base edge of the patch (and the long hemmed edge), spaced an equal distance from each other and the long edges of the patch, securing it to the tarp further.
26) Repeat Steps 24 and 25 for the remaining ridge line tie-out location using the other hemmed rectangular patch.
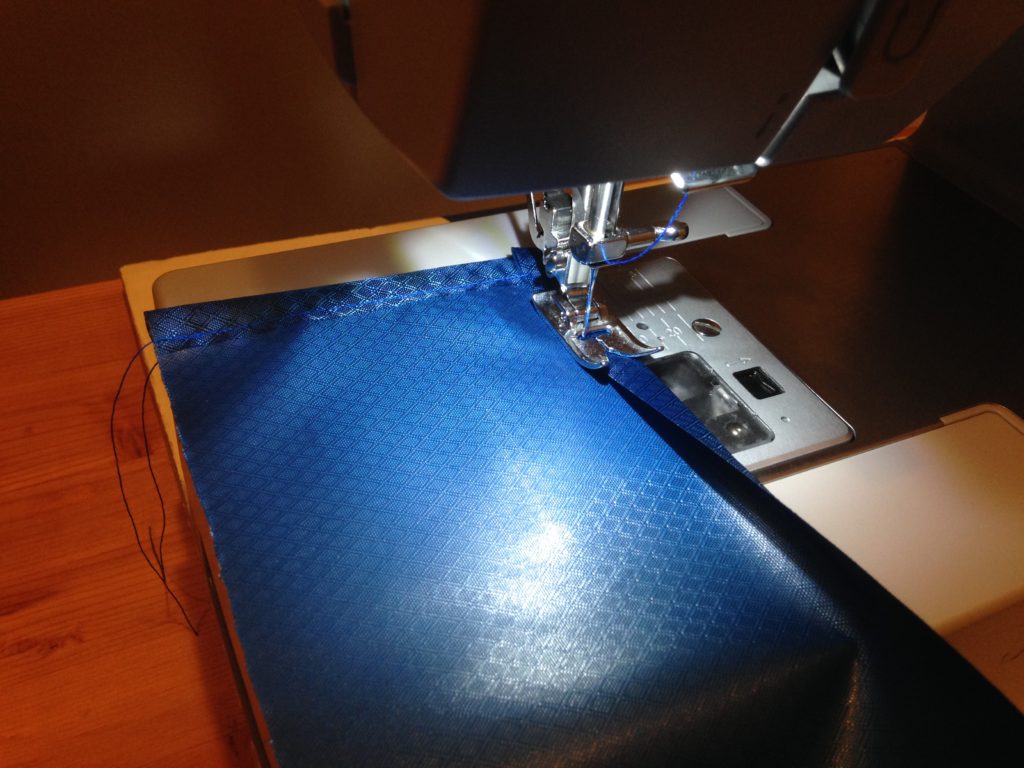
27) With all of the reinforcement patches in place, starting at one corner of the tarp, sew a continuous double-rolled hem approximately 3/8″ wide around the entire perimeter of the tarp, keeping the stitch row close to the inboard rolled edge and taking particular care around the cat-cuts. (Option: Sew a second continuous row of stitches between the first row of stitches and the outside edge of the tarp to secure the roll hem further, adding to its strength and cosmetics when under tension.) With the perimeter hem complete, set the tarp aside.
PHASE III — TIE-OUTS & HARDWARE
28) Cut the 1/2″ grosgrain ribbon into fifteen (15) 8″ pieces. Set fourteen (14) lengths aside, and cut the remaining length into three (3) small tabs, each just over 2.5″ long. Seal all ends on the fourteen (14) 8″ lengths and three (3) 2.5″ tabs with heat from a lighter.
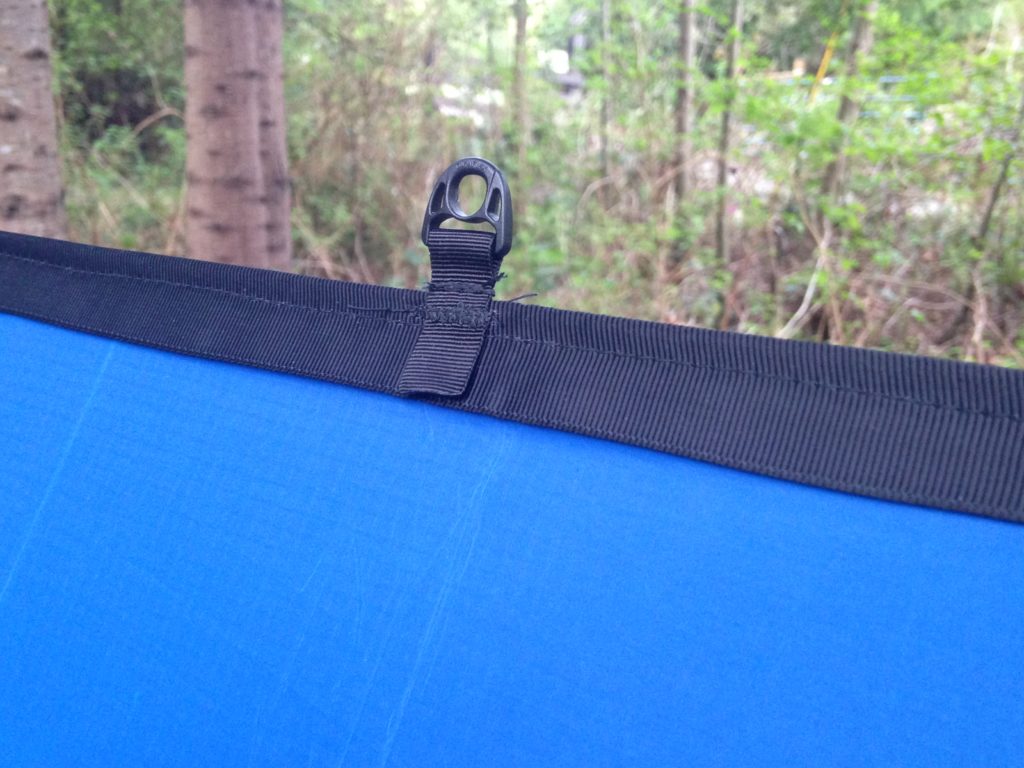
29) To prepare the side tie-out assemblies, which will be mounted at the four tarp corners and on the ground edges at the vertices between the cat-cuts, on eight (8) lengths of the 1/2″ grosgrain ribbon, mount two pieces of hardware at the midpoint, a 1/2″ Beastee Dee Ring underneath and a LineLoc 3 adjuster on top (see photo). Fold the ribbon in half around the hardware and sew a bar tack to secure each assembly.
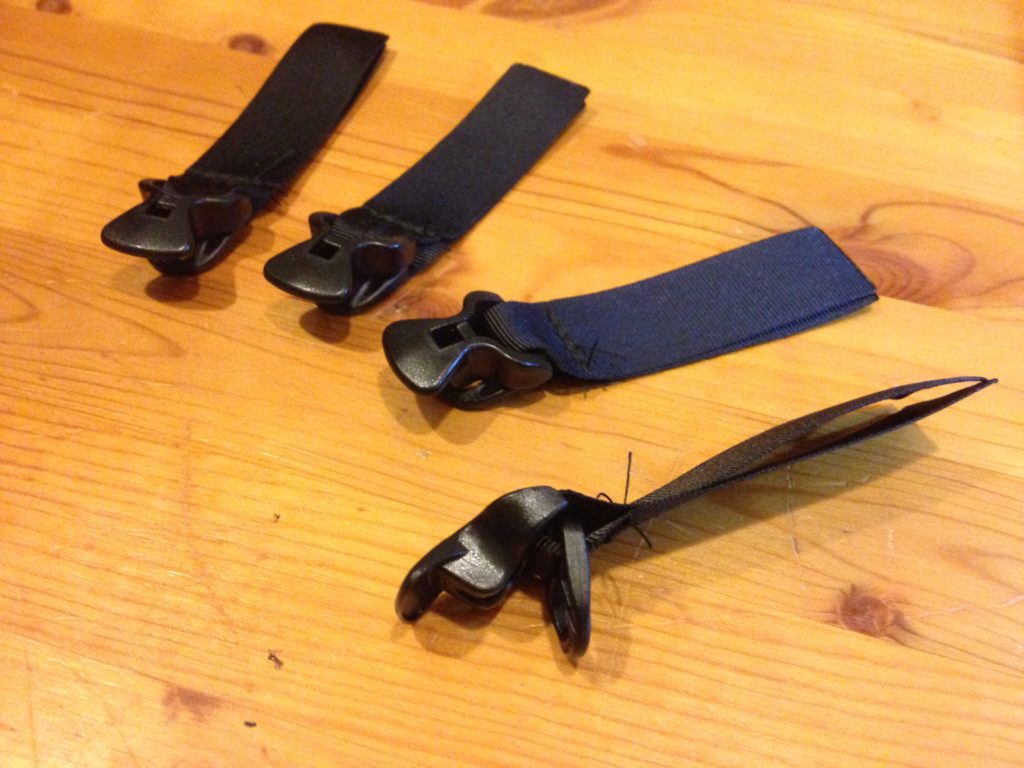
30) To prepare the supplemental tie-out assemblies for midpoints the straight end edges and the centers of the large cat-cuts, on the remaining six (6) lengths of the 1/2″ grosgrain ribbon, mount a 1/2″ Beastee Dee Ring (see photo). (If you skipped Steps 21 through 23, you only need to prepare four (4) lengths of grosgrain, with two left in reserve.) Fold the ribbon in half around the hardware and sew a bar tack to secure each assembly. Prepare the three (3) small 2.5″ tabs as supplemental ridge line tie-outs with a single 1/2″ Beastee Dee ring mounted on each.
31) Lay the tarp out flat again. Position each of the fourteen (14) tie-out assemblies at its respective location on the tarp panels, centered on the reinforcement patches, with one tail of the grosgrain ribbon on the top side of the tarp and the other tail of the ribbon underside. Verify the hardware complement and direction of each tie-out assembly during placement. (Option: Secure them with clips, pins, or masking tape.)
32) Make certain at each tie-out location that the grosgrain tails are stacked on top of one another precisely and that the tarp panel and reinforcement patch are sandwiched smoothly between them, and then secure each tie-out assembly to the tarp with a “box-X” stitch pattern; start at one of the inboard corners of the ribbon, maintain good tension on the grosgrain, and sew straight and slowly around the perimeter of the tail in a rectangle, followed by an hourglass pattern that connects the four corners of that rectangle with two diagonals. Work around the tarp until all fourteen (14) tie-out assemblies are mounted to the tarp (see overview diagram for Phase III).

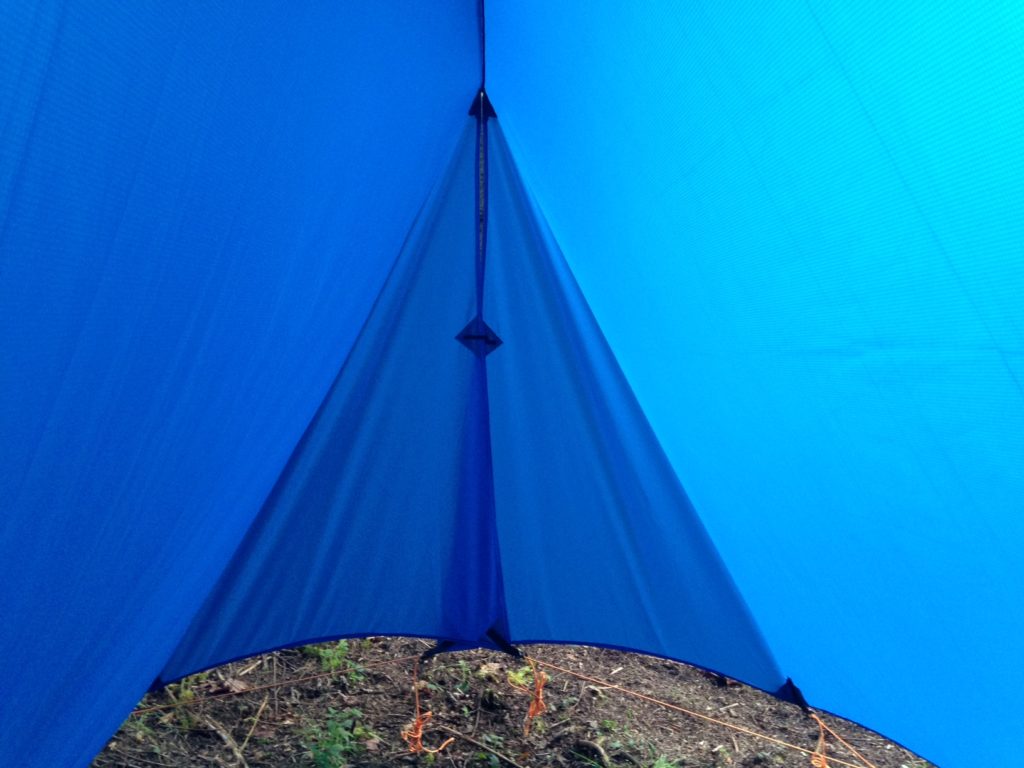
33) Fold the tarp in half along the ridge line. Starting at one end of the standing French seam at the ridge line, position the five-yard section of 1.5″ grosgrain so that it is folded over the tab of the standing seam on the tarp, making sure to leave a loose tail of ribbon about 12″ extending past the roll hem on that end of the tarp. Check to make sure the ribbon is folded fairly evenly (approximately 3/4″ on each side of the fold. Make certain the stitch row at the base of the ridge line tab is covered by the half-width of the grosgrain on both sides when the top edge of the tab is pressed completely into the fold (see photo). With these components in position, position the needle of your sewing machine and drop the presser foot so that when the need pierces the materials, it will contact the tab of the standing French seam above the row of stitches at the ridge line and NOT pierce the tarp panels. Verify that your needle is positioned correctly and the tab sandwiched within the folded ribbon is smooth and straight before proceeding to Step 34.
34) With your ridge line components properly aligned, carefully sew a single continuous row of stitches from one end of the ridge line (even with the roll-hemmed edge of the tarp) to the other, so that the stitches fall on the tab of the standing French seam. Work slowly and mind your alignment during this most critical step as you complete the grosgrain-encased ridge line seam, and check your work once this step is complete.

35) Trim the tails of the folded 1.5″ grosgrain to approximately 4″ in length past the roll hem of the tarp, and seal the cut ends with heat from a lighter. Sew the tails closed along the edges to form a folded tail 3/4″ wide on each end. Mount a 3/4″ Beastee Dee Ring on each tail of the folded grosgrain ridge line with a pair of sturdy bar tacks, and then tack down any remaining length of ribbon securely with a row of stitches parallel to the ridge line. (Option: Sew a saddle of extra 1/2″ grosgrain ribbon over the ridge line and down the roll-hemmed edge of the tarp for extra strength in extreme conditions; see photos.) Mount one folded grosgrain ridge line tab with a 1/2″ Beastee Dee perpendicular to the ridge line (i.e., vertically) at the ridge line midpoint using a study bar tack, and mount the remaining two ridge line tabs 33″ away on either side of the midpoint using the same method, completing the auxiliary tie-out points for ground pitches.
YOUR TARP IS NOW COMPLETE.
Similar DIY Projects & Instructions
