July 21, 2017
posted in: Tutorials
Have you ever found yourself asking what in the heck is a Cat Cut? This article should explain everything you need to know about Cat Cuts and their application in DIY gear making.
 What is a Cat Cut?
A cat cut is actually a shortened term that refers to a catenary curve. Catenary curves have been of interest to mathematicians for about as long as math has been around. There are many complex equations to calculate how a catenary curve will fall. I am going to strip away all the math and go back to the basic definition of a catenary curve.
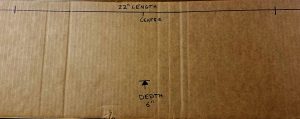
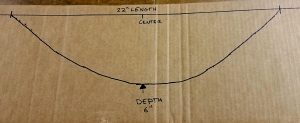
Catenary: in mathematics, a curve that describes the shape of a flexible hanging chain or cable. In fact, the name catenary is derived from the Latin word for chain – catenaria. To simplify this definition further it is the shape a rope, chain or cable makes when hanging from two points. Wires hung between two telephone poles and a chain strung between two fence poles are two examples of catenary curves you’ve encountered your whole life. There are two basic dimensions to a catenary curve the length(X) and the depth(Y) as illustrated below. 
Why Use Cat Cuts for Tarps?
1: Cat cuts help to eliminate any wrinkling over your fabric when under tension. These wrinkles are caused under normal circumstances because your tie outs or stress points are not pulling the fabric at the 90° angles it was woven at.
2: Cat cuts can eliminate some of the sag and flop in the edges of your project that would be caused when using a square edge.
*Note* Cat cuts may be unnecessary when using materials that do not have much stretch to them (Cuban Fiber, Xenon, ect.) This would be up to your discretion and experimentation with each individual material.
How to Layout Catenary Curves Manually
This is the method that I have been using to layout catenary curves for as long as I have been making my own gear. It is simple and easy to understand. It may not produce a mathematically perfect catenary curve but it definitely gets you close enough for DIY gear making purposes. You will need the following supplies:
- Thumbtacks, Nails or Screws
- Cardboard or a Pattern Material
- String or Cordage
- Marker
Step 1:
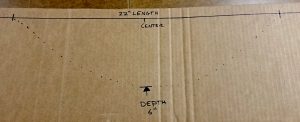
Determine what the length and depth of your cat cut needs to be. You will need to lay this out on your cardboard or patterning material as illustrated in the photo below. A great source for cardboard large enough to layout big patterns is any local appliance store. Normally they have tons of refrigerator boxes they are throwing away and are more than happy to get rid of a few.
 Step 2:
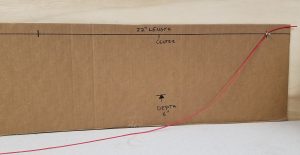
Stand your layout for the cat cut up vertically. Depending on the size of cat cut you are looking to create it might be helpful to hang the pattern material up on a wall. Usually when laying out large cat cuts for tarps I would screw my refrigerator box onto a wall that is bare studs such as in a garage or basement. You could also tape the pattern to a wall. Start by thumb tacking one end of the cordage you are planning to use(I used zing-it) to the beginning mark you made for the overall length of the cat cut.
 Step 3:
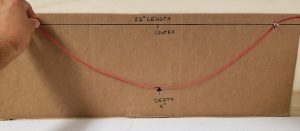
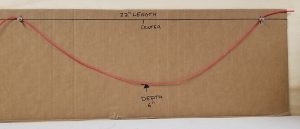
Holding the cord adjust the length of the cordage until the end of the cord is lined up with the opposing length mark and the cord draping with bottom of the cord lined up with the depth mark that you set for your cat cut earlier. Then tack the other end of the cord at the mark you laid out earlier.
 Step 4:
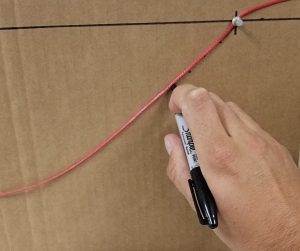
This is the step in which you will actually layout the shape of the catenary curve onto your pattern material. I use a marker and place dots that are spaced approximately 1/2″ – 1″ apart. To get these marks exactly underneath the curve laid out by the cordage you will need to move it slightly with the tip of the marker each time before placing the mark. When finished you should end up with something that resembles the photo below.
 Step 5:
This step requires some artistic interpretation. Fill in the gaps between the dots using a marker. Sometimes I find it necessary to stray slightly from the dots that have been laid out to get the curve to more closely resemble a catenary curve. You want to make the transition in between dots as fluid and smooth as possible. Here’s a photo of my finished catenary curve. The dimensions used in this tutorial were just an example. You can modify the length and width and make a huge variety of differently shaped catenary curves.
Step 6: Go out and DIY something!
Not Enough Math for You?
Thanks to the generous and innovative community over at hammockforums.net there is a calculator spreadsheet for figuring out the dimensions of a catenary curve. Catenary Curve Calculator Spreadsheet Download
Sign up for news & events
1 Comment
Leave a Comment
You must be logged in to post a comment.


I really enjoyed this article. Thank you guys/gals for helping the hammock community get just a little bit smarter.